So... it's been a while since the last post and I thought I'd take the time to update everyone on what I've been up to since last January! Better get going...
So we began the second half of second year with our Objects for Locations brief, where we were to design a piece for a location. This was left very open for interpretation and the locations could be anything from a table to a public garden to a gallery space or even a certain part of the body.
Our starting point for the work was based around manipulating paper, and transforming it from a flat sheet into a three-dimensional form. This was difficult for me to get the hang of initially, but I found myself getting into it after a while...

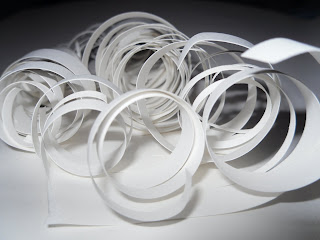


I decided to draw the forms and then manipulate the drawings by increasing the scale and focusing on the more interesting areas. From these, I took inspiration from one of the methods I had used in first year, and drew these manipulated images directly into wet plaster to create moulds which could then be used for forming.
Instead of placing a flat sheet over the mould, I wanted much more texture to be created, and so used a mixture of smashed glass, small pieces of cut glass and coloured frits to be fired into the mould. Also by doing this, the image itself would become distorted further, and this is something I wanted to achieve.
The casts after sandblasting:

I was not particularly pleased with these casts at all really. Although there were some nice effects created, it was not really something that could be developed much further, and ideally I wanted pieces which were much more three-dimensional and free-standing.
I went back to the drawing board and had another look at the paper sculptures I had formed and the images that had come from them. The strongest images to me were the ones that seemed to have strong shapes alongside areas of detail and areas of simplicity. Taking this into account, I decided to make a wooden mould which resembled the shapes taken from the images.


This was much more ideal for producing casts for more three-dimensional pieces, and as I was still on placement at The World of Glass in St. Helen's, I took the mould with me to do a sand-cast. This is where the mould is pressed into damp sand and molten glass is then poured on and takes the shape of the mould.

Close up of the result:

The sand-cast:

I had kept the glass clear because I needed to test the process out first and make sure it would be worthwhile doing. The glass had not picked up as much detail as I was expecting it to, and although I liked the piece, I still was not entirely happy with the process, plus the facilities I needed to produce it were not readily available for me to use, and I needed something I could do at our facilities in uni.
I was advised by our technician that the same effect of sand-casting can be achieved in a kiln, and so this was my next step to try out. The kiln was filled with dry plaster which I then pushed my wooden mould into. I then layered pieces of coloured Artista glass on top of the imprint to be fired, and to be honest I really was not expecting anything good to come of it!
The result:


Close ups:


Even when I took it out of the kiln I was not too fussed, but it seemed to be a hit with my peers and it seemed to attract a lot of attention from anyone who walked past it on my workspace! The colours truly come out when held up to the light, which these photographs do not show.
After this initial experiment, I continued to use this method and this time tried it with plain clear float glass built up relatively thickly.
#1

Before the firing:

After the firing:

Close ups:


#2

Before the firing:

After the firing:


Close ups:

I really liked how these had turned out, though I still felt that these were not sculptural enough. It seemed that in order to achieve the free-standing pieces I was striving for, I needed to do some lost-wax casting- a much more long-winded, time consuming process. However the results if it is successful are worth the time put into them.
In order to begin this process I needed to make a gelflex (melted rubbery substance which is poured over and left to set) mould from my wooden mould, to get the negative from it.


The gelflex mould is then filled with melted wax and left to set..


Once the plaster is set, the wax is steamed out and the plaster is left with a void which will be filled with glass and fired.
In order to get the glass into the mould however, the cullet (small pebble shaped pieces of glass) is placed into a ceramic plant pot and so when the temperature in the kiln gets hot enough for the glass to melt, it begins to drip through the holes in the base of the plant pot and into the mould (if you line it up properly!).
The 3 moulds in the kiln:

The firing was not entirely successful at all. The openings into the plaster moulds were not really wide enough in hindsight, and this caused some problems with the glass not going where it was supposed to go and one of the moulds actually exploded due to the air pressure!
Despite this glitch, the pieces were thankfully salvageable, and although they may have been slightly smaller than expected, after some serious cold-working and polishing they turned out rather nicely...
Oh- and in case you're wondering, my chosen location was an outdoor public garden :)


